Thursday, November 29, 2018

How to Fix the Missing App Store Issue on iOS 12 2019


How to Fix the Missing App Store Issue on iOS 12


Without the App Store, things would be pretty drab on your iPhone or iPad — there's practically no way to download all those awesome apps available for iOS otherwise. And if the App Store disappeared all of a sudden, then it’s of paramount importance that you get it back. But what causes it to go missing in the first place?


Mainly, it’s got to do with restrictions. iOS 12 has a neat set of content management features that can control how and what you can do with the App Store. And there’s one that entirely hides the App Store from view. Most likely, you wanted to stop someone else from installing apps before handing them over your device and then forgot all about it.

So, let's check out how you can lift off this restriction and regain access to the App Store ASAP. And if you are a parent, you're also going to learn how to manage App Store-related restrictions remotely.
ALSO ON GUIDING TECH


UNHIDING THE APP STORE

If you are coming in from iOS 11, then you won’t find the content restrictions in its usual place (within General settings) anymore. Instead, tap the Screen Time option on the Settings app, and then tap Content & Privacy Restrictions to gain access to them. If you already had a Restrictions passcode in place, you need to insert it to proceed.


NOTE: Can’t remember your Restrictions passcode? Then skip ahead to the 'Resetting Restrictions Passcode' section to check out what you can do about that.

The following steps should help you navigate through the available content restrictions and perform what it takes to unhide the App Store.

Step 1: On the Content & Privacy Restrictions screen, tap the option labeled iTunes & App Store Purchases.


Step 2: You should now see several options under the Store Purchases & Redownloads section. Tap the one labeled Installing Apps.


Step 3: Quite likely, you should see a checkmark set next to Don’t Allow. Simply select Allow instead, and then head all the way back.


Exit the Settings app, and you should see the App Store icon back on the Home screen.

NOTE: Nothing wrong with the restrictions? If so, scroll down to the section titled 'What Else Can You Do?' for an easy method to locate the App Store.
REMOTE RESTRICTIONS MANAGEMENT

iOS 12’s inclusion of content restrictions as part of Screen Time means that you can now manage the devices of family members right from your iPhone or iPad. If you've blocked your child from accessing the App Store but now want to remove the restriction, then you can do it remotely rather than fiddling with a device physically.

As soon as you finish adding your family (if you haven’t already) to your device, you should see their names appear within Screen Time.

NOTE: To add new members, tap your profile on the Settings app, and then tap Family Sharing. You need to set up a passcode (or use the one already in place) for each member during the procedure.

Simply tap on the name of your child, and you should see a set of restrictions reminiscent of those on your device. To restore the App Store for all devices related to your child, tap Content & Privacy Restrictions, and then enter the relevant passcode when prompted.


Then, it’s simply a matter of tapping iTunes & App Store Purchases -> Installing Apps -> Allow, to make that happen. Very convenient, right?

Rather than disabling the App Store in its entirety in the future, you can impose various other restrictions that aren’t so drastic. Within the iTunes & App Store Purchases section itself, you have the option to disable In-app Purchases to stop your child from making purchases without your permission. Further, the Deleting Apps option lets you restrict downloaded apps from being deleted so that you know what he or she was up to.


A further set of controls is imposable by going back to the Content & Privacy Restrictions screen, and the tapping Content Restrictions > Apps. From here, you can select various age brackets to restrict your child's exposure to specific apps. Go ahead and pick an appropriate one, and downloading apps that exceed the age ratings from the App Store should no longer be possible.


As you can see, with some smart content restrictions in place, you can provide your child ready access to the App Store without being too concerned. After all, there are a ton of safe apps for your child to enjoy, and it would be a shame to block out the App Store completely. Check out our in-depth Screen Time guide for even more details on what you can do with iOS 12’s remote management features.

Head back to the Home screen, and you should see all default stock apps — which includes the App Store — within the first page.
RESETTING RESTRICTIONS PASSCODE

If you can’t remember the Restrictions passcode, then lifting it isn't going to be an easy task. To get that done, you need to actually restore your iOS device to a previous backup created at a time when you didn’t have a Restrictions passcode in place. Otherwise, you end up with the same passcode even after the restoration.

You need to actually restore your iOS device to a previous backup created at a time when you didn’t have a Restrictions passcode in place

Further, you have to use iTunes since iCloud has only a single incremental backup at any one time. If you don't have a previous passcode-free backup, you then have to set up your iPhone or iPad as a new device during the restoration procedure. Of course, that means you lose all your data.


Before you go ahead, make sure to create a fresh backup to both iCloud and iTunes so that you have something to fall back on to just in case. And regardless of whether you choose to restore to a previous backup or set up your device from scratch, also take the necessary actions to back up any locally stored notes, photos, videos, and other forms of data manually.

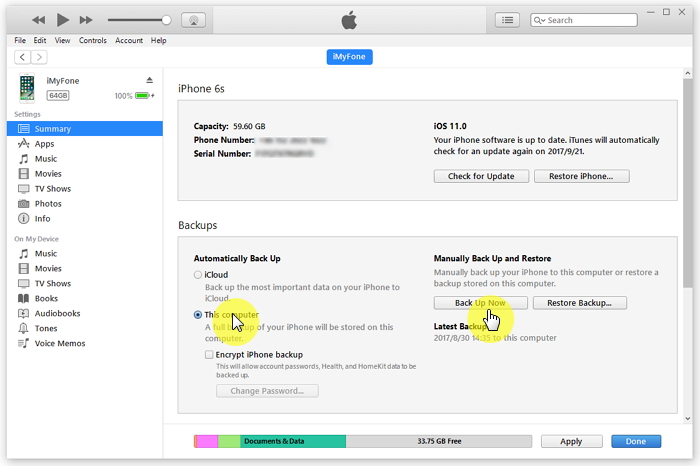
NOTE: To begin restoring your iOS device, connect it to your PC or Mac, click the Summary side-tab on iTunes, and then click Restore iPad/iPhone.

If you aren’t familiar with the process, it’s always best to let an expert do it for you — a visit to the local Genius Bar may be on the cards since attempting to reset the Restrictions passcode yourself carries too much risk.

Sponsor ads:

Gihosoft Free iPhone Data Recovery:https://www.gihosoft.com/iphone-data-recovery-free.html

Gihosoft iPhone Data Recovery Free

Free iPhone Data Recovery Software for Windows/Mac

Recover up to 12+ types of files, including contacts, SMS, photos, WhatsApp, Viber, notes, etc.

Restore lost data from iOS devices directly or from iTunes and iCloud backup

Recover iPhone data lost due to iOS upgrade/jailbreak, accidental deletion, device lost or broken

Support all the latest iPhone, iPad and iPod Touch

Both Free and Pro version.

If you lost data after you updated to a new iPhone, you can always use Gihosoft iPhone Data Recovery to get the data back from the old iPhone or backup.You may also like: iphonerecovery.com

If you use android phones, please choose Gihosoft Android Data Recovery.

With Gihosoft Android Data Recovery, no longer afraid of data loss!


Worth reading:Best youtube downloader online download youtube 1080p


Sunday, August 12, 2018

How To Fix iMessages Not Working on Mac in iOS 11.3?

Fix iMessages Not Working on Mac in iOS 11.3


How To Fix iMessages Not Working on Mac in iOS 11.3?

Tip 1. Check Internet Connection


The first thing you need to do is make sure that you have a stable internet connection. iMessages can only synchronize when you have active internet connectivity. So, check out if your phone has an active internet or else try to reset the router and reconnect again.


Tip 2. Check iMessages Server


You need to visit the Apple system status page to check whether iMessages service is down or not. It doesn’t happen very often but if there is an outage, you can find it on the website and know that the problem is with the server and not at your end.

Tip 3. Check iMessages Settings On Mac


Make sure that iMessage is enabled on your Mac. From the top menu on the Mac, head to ‘Messages’ and then to ‘Preferences’. Now, move to ‘Account’ and then check on enabling this account, or it will show that you are not online.

Tip 4. Check For Update For Mac


iMessage is a built-in App on Mac, there is no individual update for this app. Thus you should check if there is an update for the Mac OS itself and do it if found.

Tip 5. Sign Out and Re-sign in iMessage


Sometimes the problems may occur because you may have changed the password on any other device. So, you should head to ‘Messages’ and then to ‘Preferences’ and then further to ‘Accounts’. Check if the option of iMessages is selected on the left panel. You should click on sign out and then sign in again after a while. It might fix the issue too.


Tip 6. Force Quit Message App And Re-Launch It


You can try to force quit the message app. In order to force quit, you need to click on the Apple icon which is present at the top left and then in the force quit application menu, choose force quit messages. Open it again after a while and see if it is working properly.


If you lost videos from iOS Camerall Roll which are nowhere to download again, you can use Gihosoft iPhone Data Recovery to get back deleted videos from iOS device including iPhone, iPad and iPod Touch.


Gihosoft Free Android Data Recovery can help you easily recover lost data such as photos, videos, contacts, text messages, WhatsApp & Viber chats from Google Pixel/XL or other Android phones effortlessly.


Jihosoft Android Data Recovery: the best Android Data Recovery software for Windows and Mac to recover deleted contacts, messages, photos, videos, WhatsApp and etc from Android devices.


Any app suggestions or topic recommendations are appreciated in the comments down below.

Saturday, June 16, 2018

Two Simple Guide to Recover Music Missing from iTunes


Get iTunes Music Back from iDevice Using iTunes


We all know that any kinds of data can be lost unexpectedly, thus making a backup of the important data really make sense. Fortunately, Apple has provided you a free iPhone sync tool, that is iTunes. Here we'll introduce you the simple steps to transfer music from iPhone to iTunes on your PC. Follow the tutorial below to give a shot.
Process to Transfer iDevice Music to iTunes


Start iTunes on your computer, here please make sure that the latest version of iTunes has been installed correctly on your PC/Mac.


Click "Go to the iTunes Store" button.


Click "Account > Authorizations > Authorize This Computer".


Next, log in with your Apple ID and password. Click on the Authorize button to complete the authorization process.Sponsor Ads:


Gihosoft iPhone Data Recovery is a professional iPhone Data Recovery software to get back all your lost text message, photo, video, call history, note, contact and more from iPhone/iPad/iPod Touch. It offers a full solution to recover your lost data in different tough situations. Besides recovering data directly from iPhone, iPad and iPod touch, it also allows you to recover data from iCloud and iTunes backup files.


Finally, connect your iDevice to your computer with the USB cable, then select "File >Devices", and choose "Transfer Purchases from iPhone" to finish the process.


Conclusion:


iMyFone TunesMate will provide a better solution to transfer your media files between your devices as compared to iTunes. With iTunes, there will be lots of limitations for the users. With iTunes, there will be one-way transfer, limited support, and compatibility as well as many more missing features. There can be different kinds of errors and it can cause data loss in your system.

How to Fix iCloud Backup Won’t Turn on (2019)


Top 7 Ways to Fix iCloud Backup Won’t Turn on Issue


Knowing why iCloud backup button won't turn on is not enough. You need to know how to fix this issue. To help you out, we have researched on 7 ways you can use to make your iCloud backup turn on again.
1Sign out and back to Your iCloud Account


Sometimes, the reason as to why your iCloud backup won’t turn on is due to verification issues with your account. Logging out and then logging in can help fix this. But, how do you do it? Follow the steps indicated below:


Step 1: Open the iPhone settings.


Step 2: If your device is running on iOS 10.2 and above, tap the Apple ID, scroll down and tap on Sign Out. If your device is running iOS 10.1 or earlier, tap on iCloud and then Sign Out.


Step 3: Your device will ask you whether you want to erase all settings. Confirm this. You will be logged out from your iCloud account after the confirmation.


Step 4: Use the Apple ID and Password to sign in again. Check if the issue has been fixed.


2Reset Network Settings


The reason as to why you don’t have the ability to back up your device using iCloud may be as a result of a network issue. To fix this issue, perform a network reset. The following steps will help you reset your network settings:


Step 1: Open your device settings.


Step 2: Tap on General.


Step 3: Select Reset.


Step 4: Tap on Reset Network Settings.


Step 5: Confirm you want to reset the network settings.


3Check Your Wi-Fi Connection


Since iCloud can back up a large amount of data in a single backup, the backups can only work over Wi-Fi. For this reason, your device has to be connected to Wi-Fi for iCloud backup to work. Here is how you connect to Wi-Fi.


Step 1: Open Settings.


Step 2: Tap on Wi-Fi.


Step 3: Select the Wi-Fi network you want to connect to.


Step 4: If prompted, enter the Wi-Fi Password and tap on Join.


4Update Your Device


iCloud backup may not work if you don’t have the latest iOS system installed. Follow the steps below to update your iPhone:


Step 1: Visit Settings.


Step 2: Select General.


Step 3: Select Software Update to see if any updates are present.


Step 4: If any updates are available, go ahead and update the device. This may take a while, therefore, make sure you have enough battery.


5Restart You iPhone/iPad


Restarting your iPhone or iPad can help fix the bugs causing your iCloud not to turn on. Here are some simple steps to follow:


iPhone X


Step 1: You will need to press and then keep holding the device Side button together with one of the volume buttons. Wait until a slider appears.


Step 2: Drag this slide to turn the iPhone X off.


Step 3: After the device turns off, you need press and keep holding its side button for the second time until you see an Apple logo.Gihosoft iPhone Data Recovery is a professional iPhone Data Recovery software to get back all your lost text message, photo, video, call history, note, contact and more from iPhone/iPad/iPod Touch. It offers a full solution to recover your lost data in different tough situations. Besides recovering data directly from iPhone, iPad and iPod touch, it also allows you to recover data from iCloud and iTunes backup files.


iPad/iPhone 8 and Earlier


Step 1: You will need to press and then keep holding the side (or Top) button until a slide appears.


Step 2: Next, drag this slider to turn off your device


Step 3: When your device turns off, you will have to press and then hold the device side (or Top) button until an Apple logo shows.


6Factory Reset Your Device


Note that although this method has proven to be both convenient and efficient, it will erase your device data. Therefore, it should come as the last solution if the above solutions fail. To reset your phone, follow the steps indicated here:


Step 1: Launch Settings.


Step 2: Tap on General.


Step 3: Scroll down and tap Reset.


Step 4: Select the option for erasing all settings and content.


Step 5: Enter the Device password to confirm.


7Manage Your iCloud Storage


Maybe the reason as to why your iCloud backup can’t turn on is because the space available is not enough. To manage your iCloud storage, follow the steps below:
Check iCloud Storage Available


Step 1: Open Settings.


Step 2: Tap Apple ID.


Step 3: Tap iCloud.


Step 4: Tap Storage to see the space available.


Manage iCloud Storage


Step 1: Tap on Manage Storage.


Step 2: Tap on Backup.
Purchase More iCloud Storage


If there isn't enough storage, you may need to click Delete Backup to create room. If deleting your previous backups is not an option for you, you can choose fewer files to back up. You can also purchase more storage by following the steps below:


Step 1: Tap on Settings.


Step 2: Tap on Apple ID.


Step 3: Click Storage.


Step 4: Go to Manage Storage.


Step 5: Select Change Storage Plan.


An Alternative to iCloud for Backing Up iPhone with iTunes


iTunes is another great backup method that Apple offers its device users. Using iTunes is not hard. By following the simple steps indicated below, you should be able to backup your iPad or iPhone on iTunes in minutes:


Step 1: Open iTunes on your Mac or PC.


Step 2: Connect the device to your computer.


Step 3: Follow the onscreen steps if asked to Trust This Computer or for a passcode.


Step 4: Select your device when it shows on iTunes.


Step 5: To save your Health and Activity information, you have to encrypt the data. Select Encrypt [device] Backup and then create a password you can remember. For other data types, there is no need for encryption. Just click on Back Up Now.
If you use android phones, please choose Gihosoft Android Data Recovery.

Step 6: To see whether the backup is finished, check the Summary screen.


3 Simple Ways to Solve “iPhone Keeps Going to Lock Screen” Problem

3 Simple Ways to Solve “iPhone Keeps Going to Lock Screen” Problem


The following are the basic solution to fix “iPhone keeps going to lock screen” issue. You can choose any of these solutions as a way to troubleshoot your iPhone.
1. Reboot Your iPhone


The following steps describe various ways to reboot different versions of iOS devices.


For iPhone X/8 Plus: Press the Volume Up button and quickly release it, then press and hold the Volume Down button and quickly release it, and finally press and hold the Power button until Apple logo appears on your iPhone screen.If you use android phones, please choose Gihosoft Android Data Recovery.


For iPhone 7: Simultaneously press the On/Off button and the Volume Down button as the screen turns off and then turns back on and shows the Apple logo.


For iPhone SE/6s and earlier versions: Instantaneously press the Home and Power button, keep holding them until you see the Apple logo.


2. Reset all iPhone Settings


You can reset your iPhone iOS settings by following these steps:


Go to the Settings app and click on it.


Click “General > Reset > Reset All Settings".


Enter your Apple Password and confirm your request.


3. Update to The Latest iOS Version


Updating your iOS to the latest version can help to solve ‘iPhone keeps going to lock screen” issue.


Step 1: Launch iPhone Settings app from your Home screen.


Step 2: Click “General > Software Update > Download and Install”.


Step 3: Enter your Apple ID passcode, tap Agree to the Terms and Conditions and then tap Agree again to Confirm.Gihosoft iPhone Data Recovery is a professional iPhone Data Recovery software to get back all your lost text message, photo, video, call history, note, contact and more from iPhone/iPad/iPod Touch. It offers a full solution to recover your lost data in different tough situations. Besides recovering data directly from iPhone, iPad and iPod touch, it also allows you to recover data from iCloud and iTunes backup files.


The Main Reasons of “iTunes Has Stopped Working” Windows 7


The Main Reasons of “iTunes Has Stopped Working” Windows 7


Many iTunes and Windows experts are of the opinion that “iTunes has stopped working” Windows 7 stems from the following sources:


Missing files on iTunes library.


Incompatibility error between the iTunes software and Windows 7.


Outdated PC framework.


There may still be other reasons why iTunes is not working on your PC. However, we shall be looking at the best ways to fix this problem in the following paragraphs.


Do you like this story?


Sponsor Ads:


Gihosoft iPhone Data Recovery is a professional iPhone Data Recovery software to get back all your lost text message, photo, video, call history, note, contact and more from iPhone/iPad/iPod Touch. It offers a full solution to recover your lost data in different tough situations. Besides recovering data directly from iPhone, iPad and iPod touch, it also allows you to recover data from iCloud and iTunes backup files.
Other Ways to Fix “iTunes Has Stopped Working” Windows 7


The following solutions are second to the TunesFix, but they can still be used to solve this type of iTunes error.
1. Start iTunes in Safe Mode


There are two know ways you can run an application on Windows 7 PC, the first one is by double-clicking the application, while the second is by running the program in safe mode. Safe mode simply means isolating iTunes software from every interference that can be caused by plugins or third-party scripts.If you use android phones, please choose Gihosoft Android Data Recovery.


Step 1: Hold down the Shift + Ctrl keys instantaneously, and then double-click on iTunes icon.


Step 2: A notification with the instruction “iTunes is running in safe mode” will appear. Click “Continue” tab to start iTunes in safe mode.


2. Remove Third-Party Plug-ins, Add-ons, and Scripts


Third party add-ons, plug-ins and scripts that were not developed by Apple Inc. can interfere with the performance of iTunes software on Windows 7/8/10 PC. You can remove third-party plug-ins, add-ons, and scripts from iTunes by following these steps.


Step 1: Hold down the Windows key on your Keyboard and press “E” to open File Explorer or Windows Explorer.


Step 2: Click ‘This PC” or “My Computer”.


Step 3: Navigate to the following locations: C:\Users\username\App Data\Roaming\Apple Computer\iTunes\iTunes Plug-ins and C:\Program Files\iTunes\Plug-ins.


Step 4: Move the plug-ins to a different location like a desktop.


Step 5: Run iTunes again.If you use android phones, please choose Gihosoft Android Data Recovery.


3. Uninstall and Re-install iTunes and Its Related Software Components


Sometimes, working only on iTunes in the face of “iTunes stopped working” Windows 7 error is not very successful. It’s good to search for solutions beyond iTunes and include its software components. Uninstalling and reinstalling these iTunes software components would help to solve the problem.


Step 1: Hold down the Window key on the Keyboard and press “R”.


Step 2: Type “appwiz.cpl” and press the Enter key to open “Program and Features”.


Step 3: Navigate to iTunes, right click on it, and then choose “Uninstall”.


Step 4: Repeat step 3 for the following programs:


iTunes


Apple Software Update


Apple Mobile Device Support


Bonjour


Apple Application Support 32-bit


Apple Application Support 64-bit


Step 5: Restart your PC.


Step 6: Launch your browser, go to Apple website, download and install iTunes.


Step 7: Test iTunes on your Windows 7/8/10 PC.


iOS 12 Apple Measure app preview


Apple's Measure app could make the tape measure obsolete 10:15 AM ET Wed, 13 June 2018 | 01:02


Apple is launching a new Measure app in iOS 12 in the next few months that will let you size anything with just your iPhone.


You no longer have to go searching for a tape measure while hanging pictures or when trying to determine if a couch will fit in your living room.


I recently tried the new Measure app in Apple's iOS 12 developer beta. It uses the advanced cameras on newer iPhones like the iPhone X, and will presumably work on Apple's new batch of devices coming soon.


Other augmented reality apps — the type that let you interact with the real world through your phone — have been available in the iTunes App Store and for Android phones. But this is the first time Apple has introduced its own version.


Here's a preview.
First, you'll open the 'Measure' app in iOS 12. Again, this is only in the developer beta right now.


Then you'll move the phone around so it can sense the objects in the room.


Then you'll choose a point where you want to start measuring.


And then point your iPhone at the end to get a full measurement. In this example, I measured a couch.Gihosoft iPhone Data Recovery is a professional iPhone Data Recovery software to get back all your lost text message, photo, video, call history, note, contact and more from iPhone/iPad/iPod Touch. It offers a full solution to recover your lost data in different tough situations. Besides recovering data directly from iPhone, iPad and iPod touch, it also allows you to recover data from iCloud and iTunes backup files.


And a TV in the office.


It can also automatically estimate the dimensions of rectangular objects, like this lamp shade.


You can tap on a measurement to copy it for saving into notes or another app, and it automatically shows the inches to centimeters conversion.


That's it. It's really simple to use and should be available soon with iOS 12. You can see how it works in the video above.

Friday, June 15, 2018

How to Cancel iCloud Storage Plan on iPhone?

How to Cancel iCloud Storage Plan on iPhone?


Step 1: Open Settings. If you use iOS 10.3 and later, just select [your name], tap on iCloud. The storage plan you are using will be showed. For iOS 10.2 or older versions: Open Settings > iCloud > Storage.


Step 2: You need to tap Change Storage Plan.


Step 3: Tap Downgrade Options. Enter the Apple ID Password.


Step 4: Select the option of 5GB Free and then tap Done.


You may know how to cancel apple iCloud storage plan but still, have some files you need to back up on your iOS device. You don’t have to opt for another paid plan. There are free backup tools available. Gihosoft iPhone Data Recovery is a professional iPhone Data Recovery software to get back all your lost text message, photo, video, call history, note, contact and more from iPhone/iPad/iPod Touch. It offers a full solution to recover your lost data in different tough situations. Besides recovering data directly from iPhone, iPad and iPod touch, it also allows you to recover data from iCloud and iTunes backup files.


Manual Solution to Clean up iTunes Library


Manual Solution to Clean up iTunes Library

If you want to clean up your iTunes library manually, then you should use the method provided by iTunes itself. iTunes has built-in features to help you clean up the library quite easily. Follow these instructions:
Step 1: Launch iTunes on your Mac or Windows PC.
Step 2: Navigate to File > Show Duplicate Items via the menu bar of iTunes. A list of all the duplicate items will appear.
clean duplicates
Step 3: From the list of duplicate items, select the songs that you wish to delete and then erase them to clean up your iTunes library. Alternatively, there is also an option to get rid of all the duplicates at once. You can use that option to save time and effort.

3. Other Tips to Clean Up iTunes Library

Following are some other tips to clean up iTunes library:
Gihosoft iPhone Data Recovery is a professional iPhone Data Recovery software to get back all your lost text message, photo, video, call history, note, contact and more from iPhone/iPad/iPod Touch. It offers a full solution to recover your lost data in different tough situations. Besides recovering data directly from iPhone, iPad and iPod touch, it also allows you to recover data from iCloud and iTunes backup files.

a. Update Your Album Artwork

iTunes automatically recognizes your albums and updates their artwork. But if for some reason it doesn’t, then you should select the individual songs and then navigate to Advanced > Get Album Artwork option and the album artwork will be updated. If a song has the wrong artwork, then right-click on that song and select Clear Downloaded Artwork option to clear it and then download it again.

b. Keep a Good Habit

Cleaning up the iTunes library is a task that should be repeated from time to time. If you keep it well-organized, then you will be able to manage your songs, podcasts, audiobooks, TV shows, movies, etc. easily and properly. Once your iTunes library is neat and organized, you should make a habit of keeping it that way.
Here are two tips to keep it in mind:
  • Whenever you import new tracks into your iTunes library via File > Add to library option, delete the original tracks that iTunes copies from your computer’s hard drive.
  • When you import a new album into your iTunes library, make sure that album contains all the metadata you would like it to, instead of letting unedited songs pile up.

How to Backup iPhone on Windows 10


How to Backup iPhone on Windows 10

Back up your iPhone, iPad or iPod touch on a Windows 10 PC or iCloud by following the steps of these backup methods shared below.

#1. Backup iPhone X/8 Plus/8/7 Plus/7/6s… Using iTunes

Backing up iPhone to iTunes Windows 10 means copying certain files and settings from your iOS device to your Windows computer. Using iTunes to back up is one of the best ways to make sure you don’t lose the information on your iOS device if misplaced or damaged. It’s also useful to transfer your files, data, and settings when you buy a new iOS device.
By plugging your iOS device (iPhone) to your Windows 10 computer, you can sync your iPhone data to your PC hard drive using iTunes. The following are the steps of how to backup iPhone on Windows 10via iTunes:
Step 1: Launch iTunes on your PC, and connect your iPhone to your PC using Apple’s original USB cable.
Step 2: Click your iPhone icon on the top-left corner of iTunes windows.
Step 3: Click “Photos” on the left side menu, and click the checkbox next to Sync Photos.
Step 4: Repeat step 3 for Music, TV Shows, Movies, etc.
Step 5: Click “Apply > Sync” to complete the process.
sync photos
If you want to automatically back up all your iOS files at once using iTunes, you can follow these steps:
Step 1: Launch iTunes on your PC, and connect your iPhone to your PC using Apple’s original USB cable.
Step 2: Click your iPhone icon on the top-left corner of iTunes windows.
Step 3: Click “Summary > Back Up Now”.
backup now
The iTunes automatic back up method can back up information such as text messages, photos, videos, music, notes, call history, contact favorites, sound settings, widget settings, and more.

#2. Backup iPhone X/8 Plus/8/7 Plus/7/6s… Using iCloud

iCloud lets you sync your iPhone files such as text messages, photos, videos, music, notes, call history, contact favorites, sound settings, widget settings, and more to Apple servers. It doesn’t require iTunes or PC, but the amount of server space is limited to your subscription. However, you can easily upgrade or downgrade your iCloud subscription any time. Here are how to backup iPhone on iCloud:
Step 1: Connect your iPhone to Wi-Fi or WLAN network.
Step 2: Go to “Settings” on your iPhone and click on it.
Gihosoft iPhone Data Recovery is a professional iPhone Data Recovery software to get back all your lost text message, photo, video, call history, note, contact and more from iPhone/iPad/iPod Touch. It offers a full solution to recover your lost data in different tough situations. Besides recovering data directly from iPhone, iPad and iPod touch, it also allows you to recover data from iCloud and iTunes backup files.

Step 3: Click “[Your name] > iCloud > iCloud Backup > Backup Now”.
Step 4: Plug your iPhone into a charging source.
iCloud backup

How to Fix the Missing App Store Issue on iOS 12 2019

How to Fix the Missing App Store Issue on iOS 12 Without the App Store, things would be pretty drab on your iPhone or iPad — there...